
How to Use QuickBooks Online: The Complete Setup and Daily Workflow Guide (2026)


Using QuickBooks Online well breaks down into two phases: one-time setup you do when you first create your account, and daily and monthly workflows you run continuously afterward.
Most new users get overwhelmed because they try to learn everything at once. The reality is that setup takes a few hours if you follow right order, and daily workflow settles into a rhythm of about fifteen to thirty minutes a day once you've done it a couple of weeks.
This guide walks through both phases in order you actually do them. It covers initial account setup, company profile and chart of accounts, connecting bank feeds, adding customers and vendors, sending your first invoice, categorizing expenses, running payroll, monthly reconciliation, and reports every owner should look at each month.
It's written for owners setting up QuickBooks Online for first time, freelancers moving from spreadsheets, and CPA-firm clients trying to keep up with their own bookkeeping between accountant reviews.
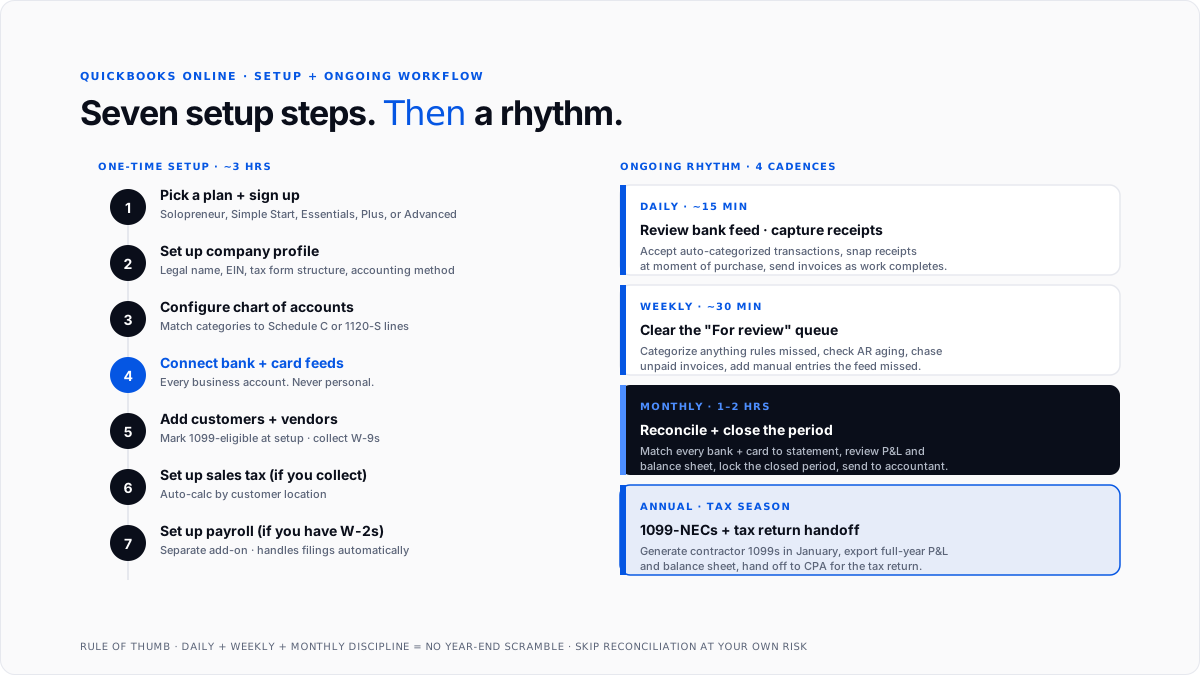
The setup phase: what to do in your first week
Setup happens once, and doing it well saves months of cleanup later. The seven steps below cover account foundation. Plan for about three to four hours across your first day or two of use.
Step 1: Choose and sign up for right plan
Before you enter any data, pick QuickBooks Online plan that fits your business. Solopreneur works for gig workers filing Schedule C. Simple Start fits solo owners with basic bookkeeping. Essentials adds bill pay and three users. Plus adds inventory and project profitability. Advanced fits mid-market businesses.
For most small businesses, Plus is right landing spot because inventory, projects, and 1099 tracking come standard, and you won't need to upgrade for a while. Solopreneur and Simple Start work for solo operations. Advanced fits businesses with 10 or more users.
Sign up through intuit.com. Intuit offers a 30-day free trial and often runs significant promotional discounts on first several months. Once you're through free trial, you're on a monthly subscription that can be cancelled anytime.
Step 2: Set up your company profile
The first screen after signup asks for your company information. Fill in business legal name, "doing business as" name if different, industry, fiscal year start month, and tax form structure (Schedule C for sole prop, 1120-S for S-corp, 1120 for C-corp, 1065 for partnership).
Getting tax form structure right matters because it drives chart of accounts QuickBooks proposes. Solo proprietors get a chart of accounts aligned to Schedule C. S-corps get one aligned to Form 1120-S.
Add business address, phone, and EIN (or SSN for a sole prop without an EIN). Set accounting method (cash or accrual). Cash is simpler for most small businesses. Accrual is required if you have inventory or if you're growing past a certain revenue threshold.
Step 3: Configure chart of accounts
The chart of accounts is categorization backbone. QuickBooks proposes a starter template based on your industry, and it's usually 80% of what you need with some adjustments.
Review each category and make sure it matches how you actually track spending. Add categories for anything specific to your business, meaning industry-specific expense categories, product lines, or client-billable pass-through accounts.
Match categories to lines of your tax return. For a sole prop, this means Schedule C Lines 8 through 27. For an S-corp, it means equivalent lines on Form 1120-S. See QuickBooks chart of accounts guide for full setup.
Don't over-engineer this. Fewer categories that get used consistently produce better reports than a hundred categories where transactions land in wrong place half time.
Step 4: Connect bank and credit card feeds
From Banking menu, click Connect an Account and search for your bank. QuickBooks connects to more than 25,000 US financial institutions through direct feeds. Enter your online banking credentials, choose which accounts to connect, and QuickBooks starts pulling in transactions.
Do this for every business bank account and business credit card. Personal accounts should stay disconnected. Commingled personal and business spending is fastest way to produce messy books, so if two are mixed, get separate accounts before you go further.
The initial pull typically imports last 90 days of transactions. If you need to backfill more history than that, you can upload additional CSVs manually or use historical transaction categorization tools for QuickBooks approach.
Step 5: Add customers and vendors
For invoicing, add your regular customers under Sales menu. Include customer name, address, email, payment terms (typically Net 30 or Net 15), and any custom billing settings.
For accounts payable, add regular vendors under Expenses. Mark any vendor you'll pay more than $600 in a calendar year as "1099-eligible" during setup. Missing this checkbox is number-one reason businesses have to redo vendor records in January when preparing 1099-NEC forms.
For contractors specifically, collect a Form W-9 from each one when you set them up as a vendor. This gives you correct tax ID and legal name for 1099 at year-end.
Step 6: Set up sales tax if applicable
If your business collects sales tax, configure sales tax center. QuickBooks tracks tax rates for every state and locality, calculates correct rate based on customer address, and tracks collected sales tax as a liability on balance sheet.
You'll still need to file state sales tax return separately (QuickBooks doesn't file most state returns directly), but report showing how much you collected is generated automatically.
Service businesses in most states don't need to configure sales tax. Product businesses and service businesses in states like Washington, Tennessee, and Hawaii that tax services do.
Step 7: Set up payroll if you have employees
If you have W-2 employees, QuickBooks Payroll is a separate add-on that plugs directly into your QuickBooks Online account. Setup takes an hour or two and requires employee W-4s, direct deposit info, and your state and federal tax IDs.
QuickBooks Payroll handles wage calculation, tax withholding, direct deposit, and quarterly and annual tax filings automatically. See payroll tax guide for how underlying tax structure works.
If you only have 1099 contractors, you don't need Payroll. QuickBooks tracks contractor payments in base product and generates 1099-NECs at year-end.
The daily workflow: what to do every day
Once setup is done, daily use of QuickBooks Online settles into a short list of habits that keep books current.
Review bank feed each morning. Open Banking tab and look at any new transactions that came in overnight. Accept ones QuickBooks auto-categorized correctly (usually most of them once your rules are set up), and manually categorize rest.
Capture receipts at moment of purchase. Open QuickBooks mobile app, snap a photo of any receipt, and QuickBooks OCR extracts merchant, date, and amount. If receipt matches an incoming card transaction, it attaches automatically.
Send invoices as work completes. For service businesses, invoicing right when work is done gets you paid faster. Recurring invoices for retainer clients or subscriptions can be scheduled to send automatically.
Reply to customer payment notifications. As customers pay through online payment link, QuickBooks matches payment to invoice automatically. Watch for any exceptions where match failed and needs manual attention.
The weekly workflow: what to do every Friday
Set aside about thirty minutes a week to catch anything daily workflow missed.
Review any transactions still in "For review" queue. These are transactions that didn't match a rule or auto-suggestion. Categorize each one and post it to ledger.
Check accounts receivable aging. Look at which customers are past due on their invoices and send reminders. QuickBooks can automate these reminders, but a manual check catches situations that need a personal follow-up.
Approve any pending expense submissions. For businesses with employees submitting expenses through QuickBooks or a connected tool, review and approve queue before transactions post to books.
Add manual entries for anything bank feed missed. Cash expenses, mileage logs, and anything else not covered by automated feeds needs manual entry to keep books complete.
The monthly workflow: what to do at month-end
Month-end is where books actually close for period, and skipping it is what produces year-end scramble most businesses want to avoid.
Reconcile every bank and credit card account. Pull statement from bank, and match it against QuickBooks. Any discrepancies get resolved before month closes. This is single most important month-end step for keeping books accurate.
Review profit and loss statement. Look at what business earned and spent during month. Categories drifting over budget deserve attention. Unusual expenses should be double-checked for miscategorization.
Review balance sheet. Make sure assets, liabilities, and equity are all consistent with what you expect. Balance sheet errors usually mean there's a data issue in ledger that needs cleanup.
Close period. After reconciliation, QuickBooks lets you close period so that no further changes can be made to those months without deliberate reopening. This prevents accidental changes that would break historical reports.
Send month-end reports to your accountant. If you work with a CPA or bookkeeper, they typically want closed reports for their own review. Most accountants have direct access through QuickBooks Online Accountant, so this happens automatically.
The tax-time workflow: what to do at year-end
Tax season is easier if daily, weekly, and monthly workflows have been running cleanly all year.
Verify all bank accounts are reconciled through December 31. Any unreconciled months from earlier in year need to be caught up before tax prep can happen.
Review P&L for full year. Confirm that categorization is consistent and that unusual items are explained. Your accountant will ask about anything that looks off.
Generate 1099-NECs for contractors. QuickBooks tracks contractor payments throughout year for vendors marked as 1099-eligible. The system produces 1099-NEC forms in January based on calendar year totals.
Send year-end reports to your accountant. The P&L, balance sheet, general ledger, and any special reports your accountant requests all export from QuickBooks in seconds.
Prep for tax return. The categorized transactions map directly to tax return lines. For a sole prop, they feed Schedule C. For an S-corp, they feed Form 1120-S. See how to write off business expenses guide for how categories flow into deductions.
Common mistakes new QuickBooks users make
Several patterns show up over and over in first six months of QuickBooks use.
Commingling personal and business accounts. Personal charges on business cards and vice versa. This is fastest way to produce messy books, and no software fix compensates for it. Get separate accounts on day one.
Categorizing every transaction manually instead of setting up rules. Manual categorization is fine for first month while you're learning. After that, bank rules that auto-categorize recurring vendors save hours of weekly work.
Skipping monthly reconciliation. Skipping just two or three months of reconciliation is enough to produce meaningful errors that then need cleanup work. Reconcile every month, without exception. The automate bookkeeping cleanup guide covers what to do when this discipline lapses.
Not marking vendors as 1099-eligible during setup. Missing this checkbox means scrambling in January to reconstruct contractor payment histories. Set flag at vendor creation time.
Ignoring "For review" queue. Transactions sitting in review queue aren't in ledger yet, so they don't appear on reports. Letting queue pile up is quickest way to produce reports that don't reflect reality.
Never talking to an accountant. QuickBooks handles daily bookkeeping, but tax planning, entity structure, and strategic financial decisions still benefit from professional help. Find an accountant early, even if it's just for an annual check-in.
How CPA firms help clients use QuickBooks well
For businesses with a CPA or bookkeeping firm, firm typically has direct access to QuickBooks Online file through QuickBooks Online Accountant.
The firm reviews books periodically (monthly for active clients, quarterly for lighter engagements), catches categorization errors, prepares adjusting journal entries as needed, and produces reports required for tax filings.
Modern firms often add automation layers on top of base QuickBooks workflow to handle categorization, month-end close, and reporting at scale across many clients. The AI layer for QuickBooks guide covers this pattern, and best AI tools for bulk transaction categorization guide covers specific tools firms use.
Conclusion
Using QuickBooks Online well is about two things: doing initial setup carefully so foundation is right, and running daily, weekly, and monthly workflows consistently once foundation is in place.
The setup phase takes a few hours across your first day or two. The daily workflow settles into fifteen to thirty minutes a day after first couple of weeks. The monthly reconciliation takes an hour or two. Compared to alternative of building books from scratch at year-end, ongoing rhythm is dramatically less painful.
For owners setting up QuickBooks Online for first time, highest-return moves are picking right plan for your business size, setting up chart of accounts to match your tax return structure, connecting every business account through bank feeds on day one, and building weekly review habit before "For review" queue gets out of hand.
For CPA firms working with clients on QuickBooks, standardizing setup template across client base and layering automation on top for repetitive categorization work is what turns per-client bookkeeping into a scalable firm-level operating platform.
Frequently asked questions
Can I teach myself QuickBooks Online?
Yes. The basic workflows are approachable for owners without accounting backgrounds. Intuit's own tutorials, YouTube channels like Kevin Stratvert and Accounting Stuff, and hands-on practice with your own transactions cover most of what you need to learn in first few weeks.
Is there a manual for QuickBooks Online?
Intuit maintains extensive help documentation at quickbooks.intuit.com/learn-support. Third-party sources like Nerdwallet and Float also publish walkthrough guides. For deeper learning, video tutorials tend to be fastest path.
How do I start using QuickBooks Online step-by-step?
Sign up for plan that fits your business, set up your company profile, configure chart of accounts, connect bank and credit card feeds, add customers and vendors, then start capturing receipts and sending invoices as work happens. The full setup takes a few hours if you follow order.
Is it hard to learn QuickBooks Online?
For basic use, no. Invoicing, expense categorization, and simple reporting are all approachable in a few days of use. Advanced use, including reconciliation troubleshooting and payroll tax filings, takes longer.
What is first step in QuickBooks Online?
Setting up your company profile, choosing your tax form structure (Schedule C, 1120-S, or 1065), and configuring chart of accounts. Everything else builds on this foundation.
How long does QuickBooks Online setup take?
About three to four hours for initial setup if you have your business info handy. Bank feed connection, chart of accounts customization, and vendor list build take most of time.
Can I use QuickBooks Online without an accountant?
Yes for basic use, though most businesses benefit from at least an annual accountant review. Complex tax situations, entity structure decisions, and IRS interactions all benefit from professional help.
How do I connect my bank to QuickBooks Online?
In Banking menu, click Connect an Account, search for your bank, enter your online banking credentials, and choose which accounts to connect. The initial transaction pull happens within a few minutes.
How often should I check QuickBooks Online?
Daily check on bank feed, weekly review of "For review" queue and accounts receivable, monthly reconciliation of all accounts, quarterly review of estimated tax positions, and annual review for tax prep.
Can I use QuickBooks Online on my phone?
Yes. The QuickBooks Online mobile app handles receipt capture, invoicing, mileage tracking, and basic reporting. Full editing usually happens on desktop web interface.
How do I know if I set QuickBooks up correctly?
Run P&L and balance sheet after a month of use. If numbers reflect what actually happened in business, setup is working. If categorization is inconsistent or balance sheet doesn't balance, something needs adjustment.

